Feeds:
Posts
Comments

Posts Tagged ‘Crafts’

It’s been a more-chaotic-than-usual autumn for us (as everyone in the family has projects and causes keeping them busy) – so there hasn’t been too much time to ponder and plan Halloween costumes. So far we have a request for a Pirate Princess and Wonder Woman.

The Pirate Princess has me a bit baffled…and since this a request from a 3-year-old – I figure she’s counting on me to work out the details.  Maybe we’ll go with pantaloons and a homemade pirate map (a very simple project)?

IMG_9407

Wonder Woman just might require the super-human help of Amazon.com this year.  Sorry crafty counterparts of the world – I just don’t think a homemade costume is going to make my Top Ten List this month.  {I’m human, right?} 

But we did make a few Wonder Woman accessories. This bottlecap + resin project was pretty fun and something I’ve seen everywhere recently.  I’ll include a detailed how-to later…if that’s okay.

DSC01465

DSC01491

We still haven’t gotten around to dragging out the decorations or carving proper pumpkins…but we did manage to paint a few acorns – so at least our birdhouse is looking ready for Halloween!

IMG_3858

IMG_3848

Happy Half-Way to Halloween!  Any signs of this mostly-American holiday on your side of the ocean? 

love-s-210[1]

Read Full Post »

Paper Dolls

Every once in a while, and usually completely by accident, we come across an activity that the girls become obsessed with. Even if it’s just a short phase, it’s fun to watch them so deeply involved in creative-play that they forget about everything else.

That is what took place last week when “making paper dolls” was selected from our Fun Ideas Jar. I had to help them draw the first doll & dress on cardstock, but after that, they kept making more and more and designing different dresses for each doll. They made at least 10 babies and set up an orphanage for all the paper doll babies, complete with cradles for each one. Although we had an abundance of sunshine last week and were out of the house a lot, when we returned home, the girls would race inside to play with their paper dolls.

IMG_3343

IMG_3354

We made hair with yarn.

IMG_3356

Look at all their dresses!

IMG_3367

She also made a family from India. 🙂

IMG_3375

I love the blue skin and a heart drawn on the chest by this little artist.

IMG_3373

Here are some babies in their cradles.

IMG_3581

After 5 days of fun, some of them have lost arms, legs or even heads, which we have repaired with tape.  Some dust seems to finally be settling on the paper doll extravaganza.  We’ll see if the enthusiasm resurfaces or not.  If not, it was fun while it lasted.

IMG_3577

Read Full Post »

We have a lot of tiny baby socks around here…not to mention a pretty big collection of mismatches.  Some of them are so cute, so colorful and I’m sorry to see those little notions go to waste. 

Instead, I like to cut the top “cuff” off and use these as small stretchy fabric bands (of sorts).  Here are four ways we put baby (and/or mismatch) socks to use around our house. 

P1070232   P1070233

IMG_0684

IMG_0712

P1070235

P1070245

P1070246

Drip-catchers, thread-wrappers, ponytail-holders and sweet baby-safe bracelets (which they also love to wear to dance class as “fancy wristbands”).

New life for little socks.  Not exactly rocket science…but oh-how-i-love rising to the challenge of “using more and tossing less.”

{Settling back into life here on “our regular coast”.  What a strange feeling it is to be “home” and “homesick” at the same time…}

love-s-210[1]

Read Full Post »

Yesterday kicked off the celebrations of the Chinese New Year. 

And of course, this is not just ANY Chinese New Year.  It’s the (ever so lucky) Year of the Dragon.  From Beijing to Bangkok, Seoul to Singapore – there will be feasting and traveling, fireworks and (perhaps?) baby booming! {The Year of the Dragon only comes around every 12 years after all.}  Festivities run for 15 days, from January 23rd through February 6th. 

Chinese_dragon

I enjoyed reading this article this morning.  The images! The colors! Oh my!

One day – someday – I would like to see all of this – up close, in person. 

For now, I’ll just have to settle with making some fabric fortune cookies!

IMGP4501

Remember when I made those ornaments out of baby clothes?  Well, I had some left over “circles,” so I decided to make these.  I only made them last night, but I’ve already been having such fun giving them to friends, neighbors and smiling strangers (okay, I haven’t given any to smiling strangers yet, but I might!). 

So easy…start with circles of fabric…

IMG_4740

Then iron on a circle of fusible fleece (I used a medium weight fusible iron-on).  Next, glue a tiny strip of wire (I used floral wire, .22 gauge) down the center of the fleece, and cover the wire by gluing on a strip of ribbon.  Then add a “fortune”… {sorry the “fortune” is covering the wire/ribbon in my picture below…}

IMGP4489

Then, just fold in half and pinch into the shape of a fortune cookie.

I made all of these (plus several more) last night while listening to the news.

IMGP4499

I can’t wait to sneak these into lunchboxes, suitcases and pockets.  <smile>  Here’s the (no-sew!) tutorial I followed.

Wishing you POWER, STRENGTH and the LUCK of the Dragon this year!

love-s-210[1]

Read Full Post »

I was at a friend’s house recently and was so impressed by her art studio.  She used to be an artist…a painter and sculptor.  Now she has a 3-year-old daughter.  She is still an artist, but her studio is piled high with plastic bottles, toilet paper rolls, popsicle sticks and a lot of fabulous recycled junk.  I admired a fairy house that she and her daughter had made using these things.  She said if we like to make things out of junk, that the girls and I should borrow their dvd of Shanes Verden (Shane’s World).

We borrowed it and we loved it!  We were completely inspired to make things out of all the recycled items I have saved.  (Apparently, I was just waiting for Shane Brox to enter into my life.)  The next day Matea copied his entire hospital scene using play dough and things we had around the house.  Next on the list was a dragon, which the girls reminded me, was made just in time for Chinese New Year (International Schools celebrate everything!)

IMG_1938

IMG_1940

IMG_1963

IMG_1970

IMG_1973

The girls discovered something pretty funny about this dragon…the hole in the whipping cream carton lead down his throat (the paper towel roll) and into his stomach (the bottle).  So they enjoyed feeding the dragon and would tip the bottle over to allow the little bits of things he ate to come out his back-side (the open end of the bottle).  Seriously.  Kids.  They live for that sort of thing.  It was not even intentional, but provided so much entertainment and laughs.

IMG_1977

IMG_1984  IMG_1982

Unfortunately, I couldn’t find Shane’s version of the dragon tutorial on You Tube, but this is a video of someone making his dragon and it is quite good.  This is also a great Chinese New Year Dragon puppet craft.

The princess tower inspiration came from Ikatbag, which is a fabulous blog full of cardboard crafts (and great sewing projects).  I was having a little trouble with her links this morning, but hopefully it will sort itself out, so you can have a look at her how to work with cardboard page.

The tower has provided lots of fun, but maybe one day we can make the whole castle, such as this one.  And how cute are these paper mache boats?  Wouldn’t they be adorable as a hanging decoration in a child’s room?

Since we had all the empty toilet paper rolls out, we also made a few small crowns, because it seems we can never have enough of those around here.

IMG_2077

IMG_2082

I will leave you with two more link, just because I know you have nothing better to do.  (Ha, ha!)  Here is Shane, creating a car and apetrol station.  There is something about him… The girls (and I) were captivated.  This video is about 24 minutes long, so sit down with the girls and watch it, if you can.  You don’t need to understand Danish to follow along, but I hope it gives you a good laugh.  Now you’ll know what we’re up against!  And here is his online game, which allows you to make a virtual version of a pirate boat or a mouse.

Enjoy!

signature_crop

Read Full Post »

I realize I’m a bit late sharing this…  January 15th – sorry!  We’ve had a wild and wonderful start to 2012 around here.   Hopefully you haven’t gotten rid of all your cards yet?!

Personally, I’m always slow and reluctant to say goodbye to all of our holiday cards.  I find something so sad and unfortunate about dropping another year’s worth of joyful correspondence into the recycling/rubbish.  All those familiar faces and well wishes…just disposed of and erased from sight.  After all, this is (probably) the only time of year we’ll get colorful images and happy words from busy, bustling, faraway friends & family. 

This year I decided to brainstorm things we could actually create with our collection of cards.  Here are 3 things I thought were worth sharing.

Puzzles

We’ve made a bunch of these, which we keep on the kitchen table for the girls to put together while they have breakfast/lunch.  They love asking who all the kids are and how we know their parents.  It’s a nice way for the girls to “meet” old friends…despite the distance. 

IMGP4331 IMGP4336

IMGP4335 IMGP4347

Marble Magnets   

We made these using some old glass (flat-bottomed) marbles we had laying around.  I cut up some of our old Christmas cards and glued the smaller images onto the back.  Then we cut up some magnets we had on the fridge (the ones advertising pizza, dentists, etc.), which worked okay – though in the future I might try using those little black circles magnets…since you need a pretty strong magnet to hold the marbles.  There’s room for improvement here, but you get the idea, right?

IMG_4198 IMG_4189

Geodesic Ornament

So, I guess I’m in the midst of a paper-craze…particularly all things origami-esque.  So clearly, I had to give this a try.  I saw it somewhere else using printed scrapbooking paper, but thought it would work great with Christmas cards.  I didn’t follow their technique exactly, but instead opted to use a triangle template to make the 20 triangles (which then get glued together to create the ornament).  I imagined collecting photos of classmates, teammates or colleagues and making these for teachers, coaches, office staff.  For now, I think I’ll gather a few of our family’s past photo cards and try making an ornament for the grandparents.

IMGP4421

IMGP4349 IMGP4350

IMGP4352 IMGP4392

IMGP4394      IMGP4395

IMGP4353  IMGP4360
IMGP4400  IMGP4412 IMGP4436

Obviously, any of these projects could be used with regular photographs, but I find something very satisfying about extending the life of those cards and keeping those smiling faces around…just a wee bit longer. 

love-s-210[1]

Read Full Post »

What is a onesie, but a teeny-tiny t-shirt – right?  So, I thought I’d add some projects to my repurposed t-shirt list which apply to onesies. 

First of all, I love onesies.  Even the word… 

Onesie

{You have to admit, it’s a cute word.} 

And even though my girls are (well) beyond the onesie years, I can’t quite bring myself to get rid of all of them.  Those gorgeous prints and sweet-baby patterns just whisper to me…

Keep me around…I’ve been here since the beginning…I belong here.”

And so I do.

I know I could donate them or pass them along – and I have.  But there are a few.  A few that still remind me of rocking tiny bodies to sleep, pacifiers, spit up and first words.  Those I tend to hang onto…if only to run across them every once in a while, hold them close, press them to my nose.  And remember.

Lately, I’ve been convinced that there must be a few things I could actually do with some of these onsies.  Repurpose them.  Find a way to give them a new life – or (at the very least) make use of that cute fabric.  

So — here are 4 cute (and quick) onesie projects…just in case you’re (drowning) in a similar (onesie-filled) boat:
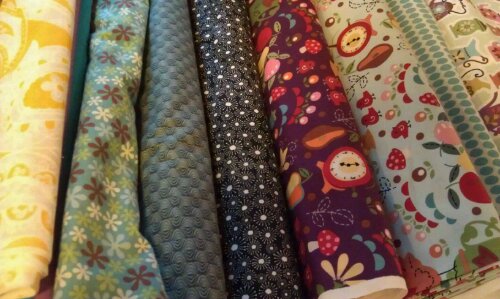
The (unfinished) QuiltI’m still working on this one.  I’d like to make it big enough to snuggle up on the couch with.  No fancy “log cabin” patterns here – just simple squares.  I’ll probably use an old set of flannel sheets to make the bunting & the backing (eventually).    IMG_0783

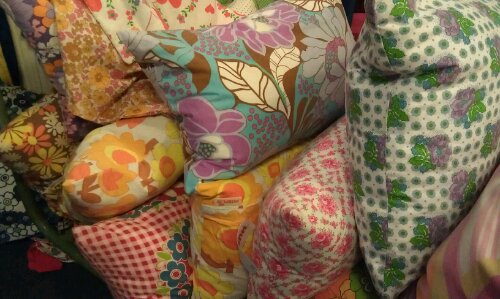
The (tiny) Pillows:  Granted, these are not terribly “useful.”   Though, I remember that mom made some for our dollhouse when we were little and we loved them.  So, I figured my girls would like them too – and, of course, they do.  

IMG_3824

The (oh so soft) Handkerchiefs:  Once winter arrives, little noses (and not-so-little noses) start dripping.  And the soft cotton from a well-loved onesie feels so much better than paper.  Just cut up some onesies (into squares), stitch & turn.  Toss in the wash to clean and use all winter long.  [You could actually skip the “sewing” step and just cut them with pinking shears.  They may start to fray eventually, but they’ll surely last longer than a Kleenex.]

IMG_3725

IMG_3731

The Banner:  I took a bunch of old green, brown and orange onesies and made this Ode to Autumn banner.  Just cut out some triangles, then zigzag stitch all around (right sides out).  I took some scrap fabric and made the black bias tape, which I just sewed to the top.  Viola…

DSC07820

IMG_3501

I ♥ repurposing.  Can you tell?  <wink>

love-s-210[1]

Read Full Post »

We moved to a different area of Copenhagen, not far from where we were, but far enough to explore new streets and use a new grocery store. We will need a new favorite coffee hang-out (there is already one in the running) and we will undoubtedly discover new shops for things we need.

Yesterday I found this jem-of-a-store about a 15 minute walk from home. It sells an eclectic array of mostly second-hand fabric, beads, buttons and craft supplies (and of course, yarn).  I could spend a very long time looking around this shop.  Today, as the rain fell sideways, I did.

image
image
image
image
image
image
image
image
image
image

Read Full Post »

We returned Sunday night from a wonderful weekend away, with thoughts of a busy week ahead, as we plan our move to our new apartment and prepare for a long-over-due sea shipment to arrive.  We have been told that it’s customary for previous tenants/owners to take all light fixtures with them, so unless we want to live by candlelight for the first few days, we need to buy some lamps ASAP.  But we also returned from our trip with two coughing, stuffy-nosed kids.  So, with the girls home from school, nursing a couple of bad colds, I have had to abandon my plans to buy lamps for our new apartment.

So while the girls were busy coloring pictures…and aparently dreaming of sunnier places (Hawaii?!?!)…

And while my laundry hung to dry…

I spent much of this morning lost on the internet.  Do you ever start browsing and get so lost that you forget what you were originally looking for in the first place?  For me this usually ends with a mind full of inspiration, coupled with a slightly overwhelming feeling of wanting more hours in the day.  I have to keep reminding myself that we have a long, dark winter ahead of us – so perhaps you’ll see these projects come to fruition in future months.

So if was not hanging laundry outside (hoping it doesn’t rain), wiping two runny noses and packing bags to make our next move, I would be:

Sewing these fleece boot socks

Knitting these “Reading mits

Cooking this amazing-looking Heirloom Tomato Tart

And some creamy Chocolate Coconut Pudding

Getting ready for my favorite season, by making these adorable fabric pumpkins

Making this pretty Ruffle Lamp Shade (once I get around to buying the lamp!)

And of course, I can always get lost in travel planning…

Wait – that’s it!  That’s what I set out to do this morning!  I was going to book a hotel in Ronda, for our trip to Spain next month.  How did I let myself get side-tracked from one of my most favorte places in the world?

Hope you are having a happy and productive week so far!

Read Full Post »

I realize that your west coast world is crazy right now.  Houses to move out of.  Storage to squeeze into.  Visas to arrive.  Oceans of friends and relatives to bid farewell to. 

However — here on the east coast — it’s summer.  The long, lazy kind.   And, on the longest day of the year, we decided it was time to catch some butterflies. 

So, remember that broken clothes dryer?  The one we ripped the dowels out of and used to make the bubble wands?  Well, we found another project for repurposed dowels. 

IMG_1652

The girls have been asking for a butterfly net for a while now.  In fact, we’ve been so slow in responding to this request that Wynn called her grandmother (in Iowa) this past weekend and asked if she could send her daddy’s old butterfly net (apparently, he was a BIG butterfly hunter back in the day).  Rumor has it that grandma has already purchased two nets; which she plans to bring over later this summer.  However, since patience is not a four-year-old virtue, we decided to make something in the interim. 

So, as luck would have it…if you take a coat hanger, an empty lime bag, a repurposed dowel and some duct tape…you can make a pretty nifty butterfly net. 

IMG_2269

IMG_2272

And (fortunately)…it works like a charm.  Wynn was able to catch (and release) four butterflies on her first expedition.  

IMG_2277

IMG_2283

IMG_2279

To make one (someday…that is…when you’re not trying to move to Denmark), you’ll need:

  • A large wire coat hanger
  • A large net bag (the kind used to hold citrus fruits) *
  • A long, thin dowel
  • duct tape

* We tried an avocado bag first (pictured below), which I think would do the job, but we decided that a larger, sturdier bag would work best (and cause less injury to butterflies). 

IMG_2265

  1. Use needle nose pliers to open up the coat hanger.  You’ll want one long piece of wire.
  2. Create a circle, roughly centered and fold down either end of the wire (to create a lollypop shape). 
  3. Attach your net bag.  We just tucked ours around the wire and used duct tape to hold in place.
  4. Wrap the ends of the wire around the dowel and cover well with duct tape. {see pics above}
  5. Go (gently) catch (and quickly release) some butterflies.

Alternatively, you could try using it to catch herring off the Nyhavn pier in Copenhagen. <smile>

IMG_2288

love-s-210[1]

Read Full Post »

Older Posts »